This article is a guide to using the Registration Groups sub-module in Certain. This advanced feature of the Certain platform is not enabled in an account by default, but if you’re interested in it after reading this article, please email help@certain.com, including your account name.
The functionality in this sub-module is available to users with a user type of Registration Support or higher, except that groups can only be added by an Event Builder or an Administrator.
Contents
- What are “Groups” in Certain?
- Why Would I Use Groups in my Event?
- About Setting Up and Using Groups
- Enabling the Registration Groups Sub-Module
- Setting up Groups
- Custom Fields for Groups
- Adding a Group
- Attendee Types
- Agenda Items
- Session Occurrences
- Rotations
- Custom Fields
- Assigning Group Membership
- Letting Registrants Select Their Group
- Using Form Logic
- Assigning Groups on the Registration form
- Using Groups in Conditions in Form Logic
- Assigning Groups in Bulk
- Editing Individual Registrations
- What’s a Group Coordinator?
- Reporting and Monitoring
- Group Summary Report
- Custom Reports
- Emails
What are “Groups” in Certain?
- They’re a way of combining sets of registrations for management and reporting purposes.
- You can have as many groups as you like.
- A registrant can be assigned to just one group.
- A registrant must have an attendee type before they can be assigned to a group.
- A group of registrants often needs to share a set of common travel schedules and activities. "Hosted buyers", for example, are registrants requiring specific processes and care at an event, so may need to be managed in groups.
Why Would I Use Groups in my Event?
- To ease the management of registrants attending an event as a group.
- For example, you are running a trade show, and various hotel chains are sending representatives from each hotel as hosted buyers. You could have a group for each chain, or one for each country.
- From the provider/host perspective, it is important for event providers to track performance indicators with regard to these groups. For example, track the number of actual registrations vs. the expected number per group.
About Setting Up and Using Groups
The steps involved in setting up and using groups in Certain are explained in some detail in the rest of this document, but here is a brief summary.
Switching the feature on in the event
- Enable the Registrations Group sub-module in Plan > Configure > Options.
Setting Up the Groups
- If required, set up Group Custom Fields to extend the information held about each group.
- Add named groups: see “Setting up Groups”.
- Each group is restricted to one or more specified attendee types.
- (More than one group can be restricted to the same attendee type(s).)
- You can set the “target” number of registrants in each group, and inventory limits.
- Agenda items and session occurrence can be assigned to group members automatically.
- You can specify Appointment Rotations, Event Airports and Transportation Preferences for a group, limiting the choices available to its members.
Using the Groups
- You can assign registrants to just one group (or to no group):
- Via a registration form,
- where the registrant selects their group from a list, or
- where the registrant enters the group code you have sent them, or
- using form logic, where you can customize the list from which the registrant chooses, or have the form determine the group assignment.
- Manually on the admin side,
- Via a registration form,
- You can track the estimated and actual numbers of registrants in each group.
- Group members can be assigned as coordinators, to ease communication.
- Group information is available in reports, email templates, and forms
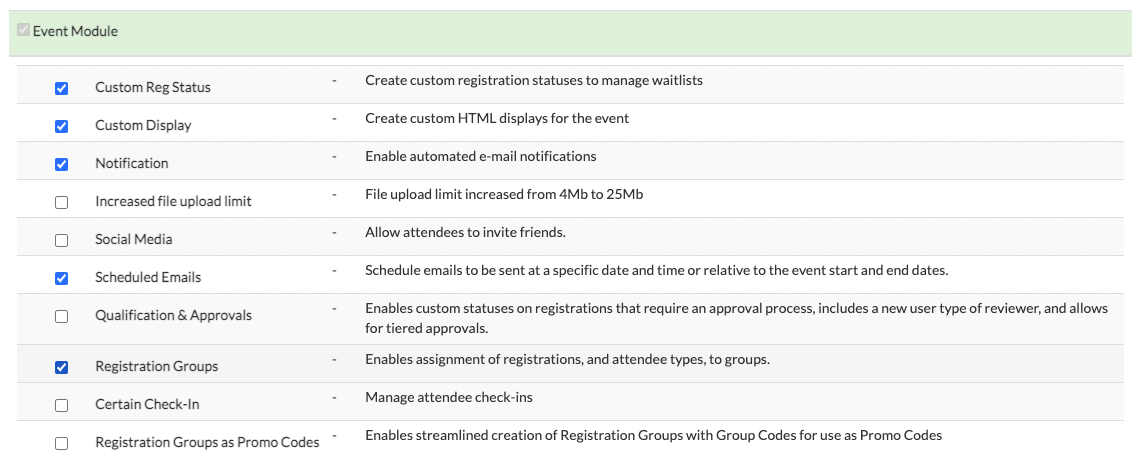
Enabling the Registration Groups Sub-Module
In the event, go to Plan > Configure > Options, and select Registration Groups under Event Module in Functional Areas Needed by This Event.
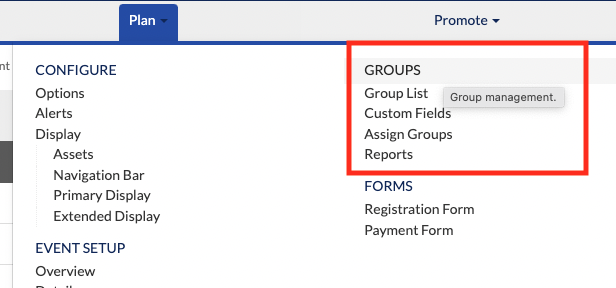
The Plan menu link on the Top Navigation Bar in the event will now include a link to the Groups page, as described below. That is where you set up the groups.
Setting up Groups
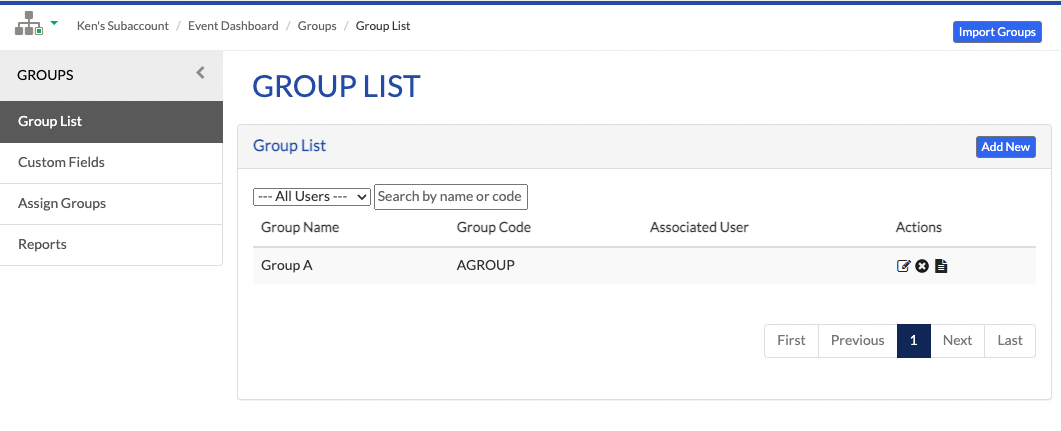
As an Event Builder, in the event, go to Plan > Groups.
The Group List page lists any groups that have already been added.
Custom Fields for Groups
You can add one or more custom fields for groups. These enable you to store additional information about groups, and are displayed on the Group Summary report.
To add custom fields, go to Plan > Groups > Custom Fields, type a name for the first one, and click Add. Then repeat for any additional custom fields.
You can set values for these fields when you are adding or editing a group, as explained next.
Adding a Group
Click Add New to add a group, or to edit one.
As illustrated in the screenshot overleaf, follow the steps below to set up your new group.

1. Give the group a Name, and a unique Code.
2. Select an Associated User, if required. When a user associated with any groups goes to the Groups page, by default they see only those groups. This enables “account managers”, for example, to see just the groups for which they are responsible. (They can, however, still choose to see all groups.)
3. Optionally, add a Description of the group, and/or any Notes about it.
4. Select one or more Attendee Types to which this group is restricted.
5. Save the group. This adds further sections to the page, where you can edit further information, as illustrated and discussed overleaf.
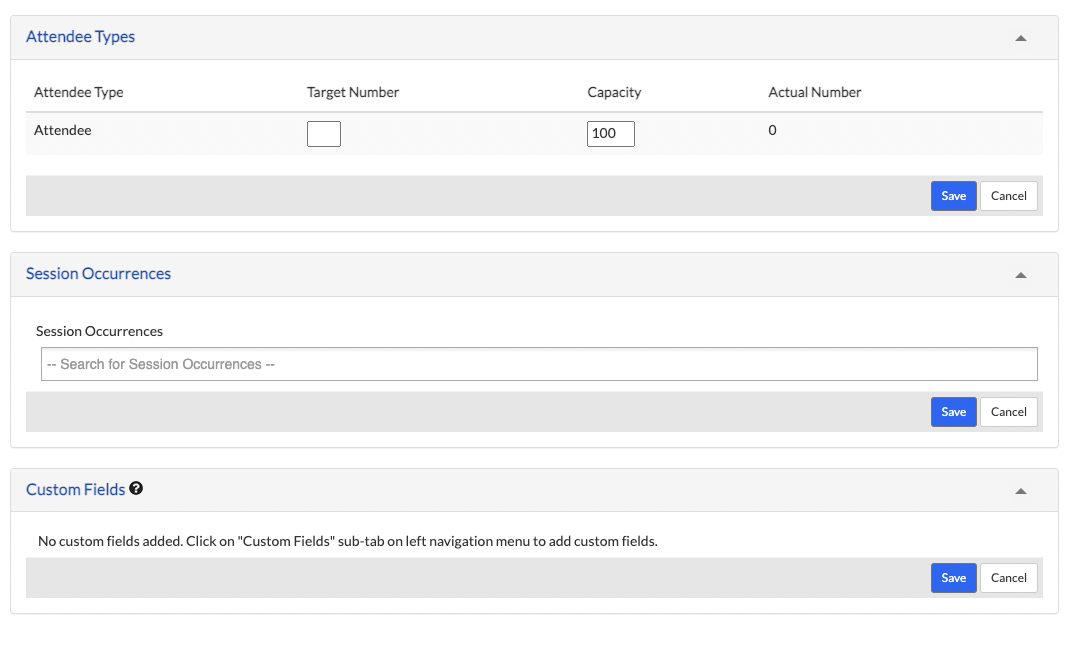
Attendee Types
6. If required, specify the Target Number of registrants in that group for each of its Attendee Types. An Actual Number is displayed: the current number of registrants in this group who are of the selected attendee type. If you are adding a new group, rather than editing an existing one, then of course this will be zero so far, as in the screenshot above.
7. If required, specify an Inventory figure for each attendee type: the maximum number of attendees in this group who can be of that type.
Note: This Inventory (if entered) is used to limit assignment to the group on a registration form. If the membership of the group has already reached its Inventory level, then an attendee selecting that group sees a warning message, and is prompted to contact their group coordinator for the next steps.
The Inventory limit is only used in forms; an event planner can still assign attendees to the group manually, even if the group has reached (or exceeded) its set Inventory.
Agenda Items
8. You can select any agenda items that have unlimited inventory, for them to be assigned automatically to any attendee who registers as a member of the group (via a registration form). These agenda items may have fees, including fixed fee and percentage discounts, making it possible to use a group as a "promo code", to apply discounts automatically.
Session Occurrences
9. If the Speaker and Session Management Module is enabled for the event, you can select any session occurrences to be assigned automatically to any attendee who registers as a member of the group.
Rotations
10. If the Appointment Rotations sub-module (of the Appointments Module) is enabled for the event, then you can select the rotations to be available to registrants in the Group Rotations section of the registration form, based upon their group.
Custom Fields
11. If you have set up group custom fields, you can assign values for up to ten of them here for each group.
Assigning Group Membership
You can assign a registrant to one group. As mentioned in the introduction, that can be done in four ways:
- On registration forms:
- enabling the registrant to select their group, or
- assigning a group to the registrant.
- Manually on the admin side:
- in bulk, selecting multiple registrants on one page, or
- individually, in a registrant’s registration record.
Letting Registrants Select Their Group
On a registration form, you can allow registrants to select a group from a list or by entering their group code (which you have supplied by email, for example).
To enable this, add a Groups section to the form (in Plan > Forms).
Note: The groups available on the form for the registrant will be restricted to those that are for that registrant's attendee type, so the Groups section needs to be after the attendee type has been selected or assigned.
Select one of these two check boxes:
- Display select field containing all groups available to attendee type – The attendee must select the group from a list of the group codes available to their attendee type.
- Display input field for group code – The attendee must enter the group code as a precise match to the one you have sent them.
You can choose to make the Group Code a required field, and can customize its label. You can also customize error messages the attendee might see, such as if they enter an invalid code.
The following field is applicable whichever of those two options you select:
Validate against total group inventory – If selected, then the check for whether the group's capacity has been reached, i.e. whether the attendee can be assigned to the selected group, includes the inventory for all the attendee types in the group, not just the one for the attendee’s own attendee type.
Example:
In Group A:
- Attendee Type X: Inventory = 1. Actual number assigned = 1. (That is, capacity reached.)
- Attendee Type Y: Inventory = 5. Actual number assigned = 5. (That is, capacity reached.)
- Attendee Type Z: Inventory = 5. Actual number assigned = 3. (That is, capacity of 2 remaining.)
If an attendee of Attendee Type Z selects Group A, they will be assigned because capacity has not been reached.
But if Attendee Type X or Y selects Group A, then whether they will be assigned depends on whether the Validate against total group inventory option is selected or not:
Not selected: Attendee will not be assigned, because the capacity for their attendee type has not been reached.
Selected: Attendee will be assigned, because the capacities across all the attendee types in that group are included, and there are still two places left for attendee type Z.
Using Form Logic
You can also use Form Logic to achieve this, in which case you set conditions (as usual for logic). For example, limiting groups to certain countries of origin.
In the event, go to Plan > Forms, select (or add) the form, and click the Logic page link.
Add a new rule, and select the Display Action: “Display Groups”.
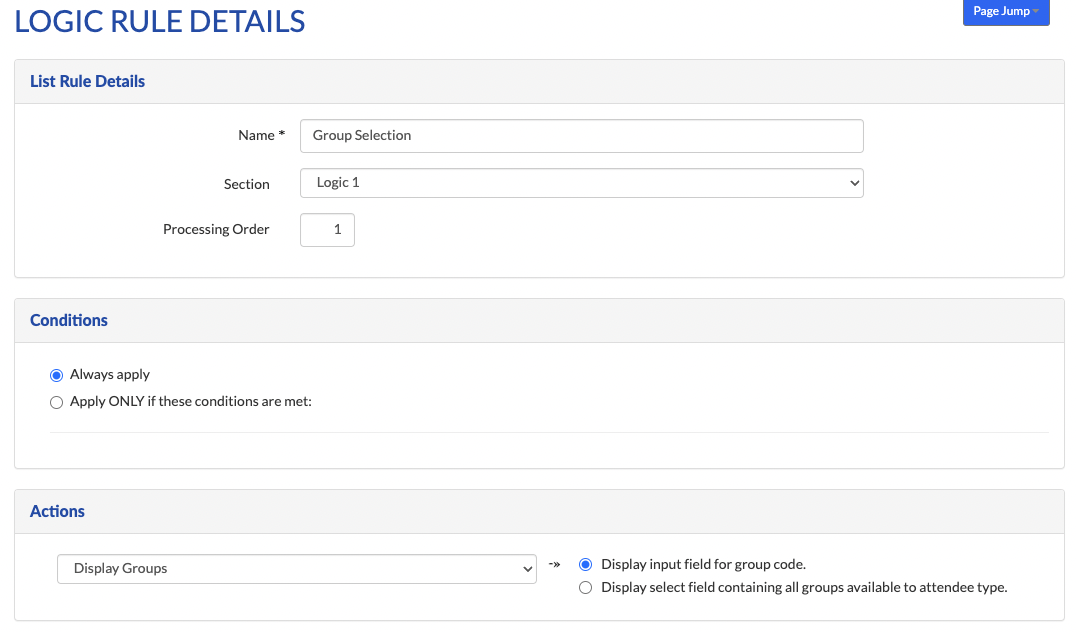
Choose how the attendee will select their group:
1. by typing their group code (which you have supplied by email, for example), or
2. by selecting it from a list (of all those available to their attendee type).
(The groups available on the form for the registrant will be restricted to those that are for that registrant's attendee type, so the logic action needs to occur after the attendee type has been selected or assigned.)
Set up conditions in the rule, as necessary.
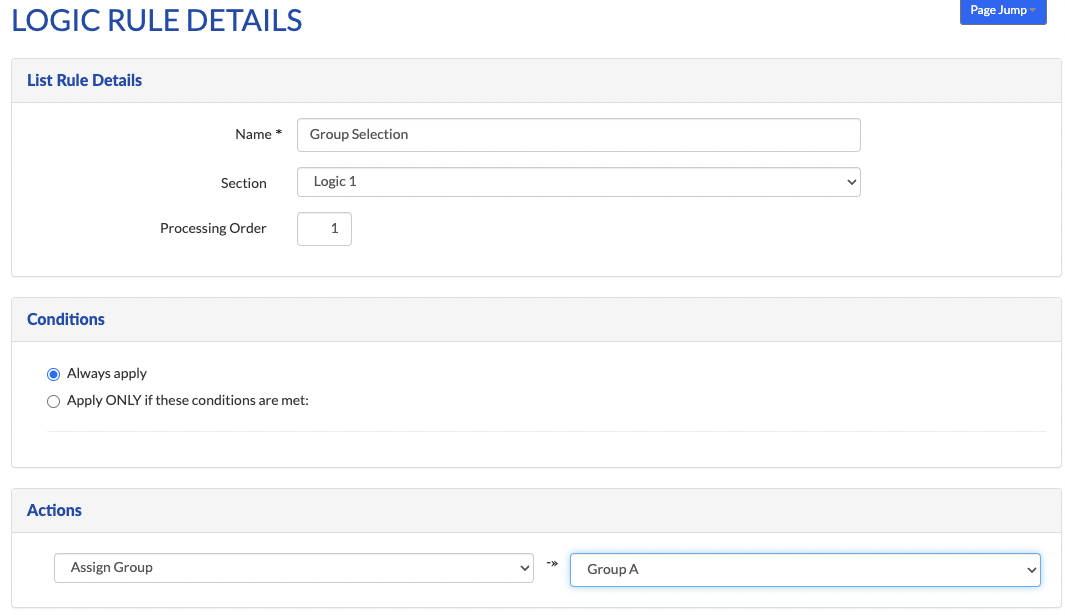
Assigning Groups on the Registration form
Instead of letting registrants choose their own group, you can assign a group to them, using Form Logic.
In the event, go to Plan > Forms, select (or add) the form, and click the Logic page link. Add a new rule, and select the action, “Assign Group”. Then select the group to be assigned.
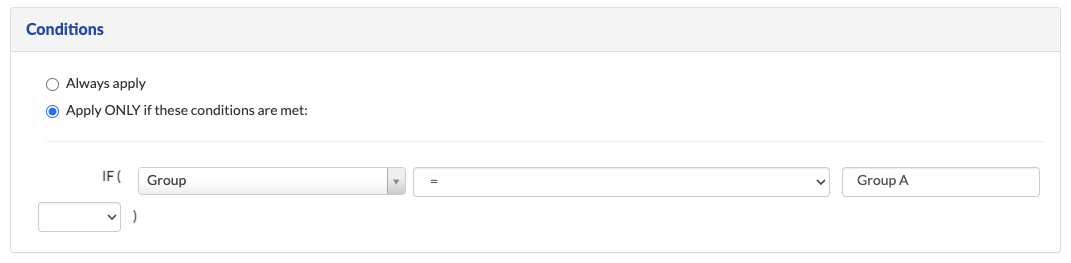
Using Groups in Conditions in Form Logic
Note also that it is possible to use a Group in the conditions of a form logic rule. That might be appropriate if, for example, you have pre-assigned groups when sending out invitations to register.
Assigning Groups in Bulk
You can assign groups in bulk, selecting multiple registrants on one page. Go to Plan > Groups > Assign Groups.
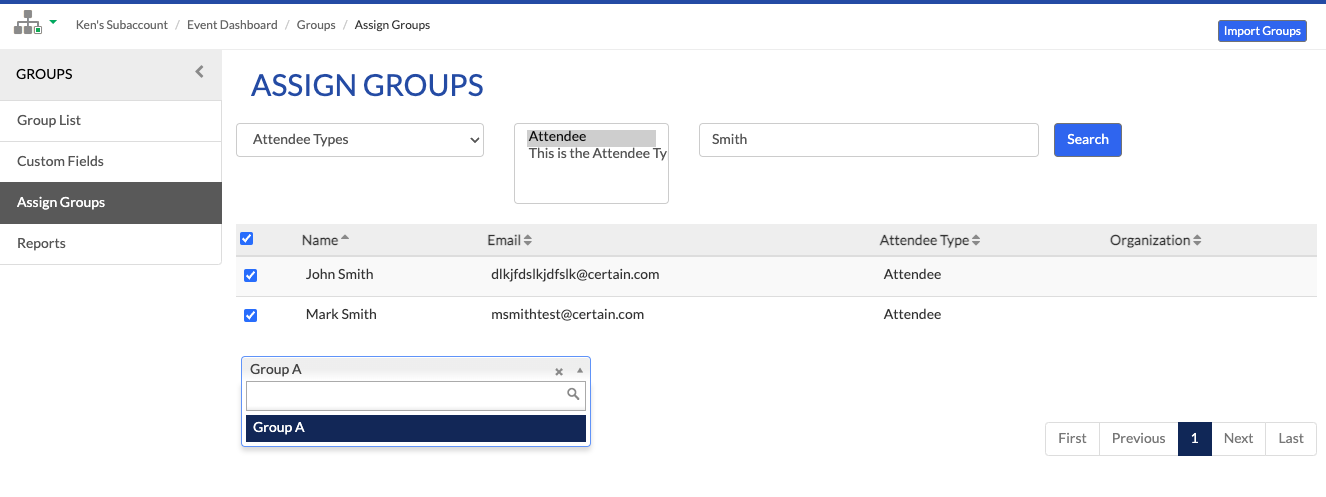
This is a two-step process:
1. Select registrations for group assignment
- You can choose to filter the registrations displayed by one of a number of fields: First Name, Last Name, Organization, Title, City, Country, Attendee Type, Registration Questions, Travel Questions, or Profile Questions.
- Select the check boxes next to the registrations to which you want to assign groups.
- You need to be selecting registrants who can all be assigned the same group – they must have attendee types for which the group is set up.
2. Select group
- Select the group you want to apply to the selected registrations.
- Click Save, and all those selected registrations will then be in the selected group.
Note: Agenda items associated with a group are only assigned to an attendee when the attendee registers via a registration form. They are not assigned when a planner assigns a group to an attendee (via Assign Groups, as described above, or on their Attendee Profile, as described next).
Editing Individual Registrations
You can edit the group on a registrant’s record. Go to the usual Attendee Profile page for that registrant; for example, by searching for them by clicking Search in the global navigation icons (at top right), and clicking edit on the Registration section heading.
The Registration information section at the end of the Attendee Profile page includes the registrant’s group, which you can change by selecting a new one from the drop-down list. This section also includes a check box indicating whether the registrant is a Group Coordinator.
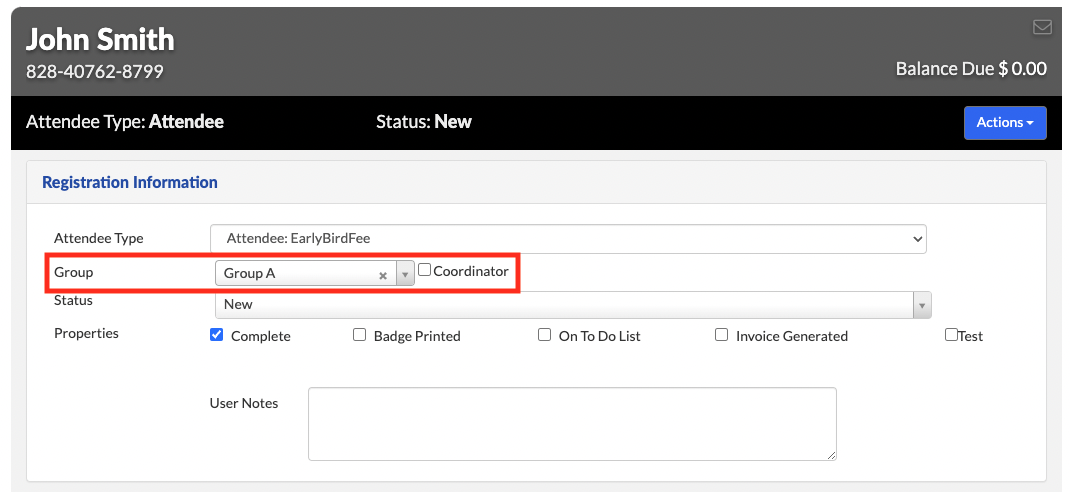
What’s a Group Coordinator?
Each group can have one or more members who act as coordinators. These would usually be the people responsible for organizing group activities, for example. This Attendee Profile page is where you assign a registrant as coordinator, by selecting the Coordinator check box.
Reporting and Monitoring
Group information is available on standard and custom reports, and in emails, as explained here.
- Group Summary Report – Track numbers of registrants in each group.
- Custom Reports – You can include group information in your own reports.
- Emails – And you can include it in email templates.
Group Summary Report
A Group Summary Report is shown on the Plan > Groups > Reports page. It lists all groups, with their coordinators and their numbers of attendees.
If you are using the Qualification and Approval module in your event, the last total columns on the right are one for each approval status, and the “Not Yet Qualified” column before them shows the number of registrants who have not yet completed the qualification process-the number who do not yet have an Approval Status.
Click one of the numbers on the report to open a report results window listing the attendees in that group. As usual, you can then select attendees’ records there to run mass actions, etc.
Custom Reports
To build a custom report which includes group information, select the Registration Groups report type from the Report Type dropdown.
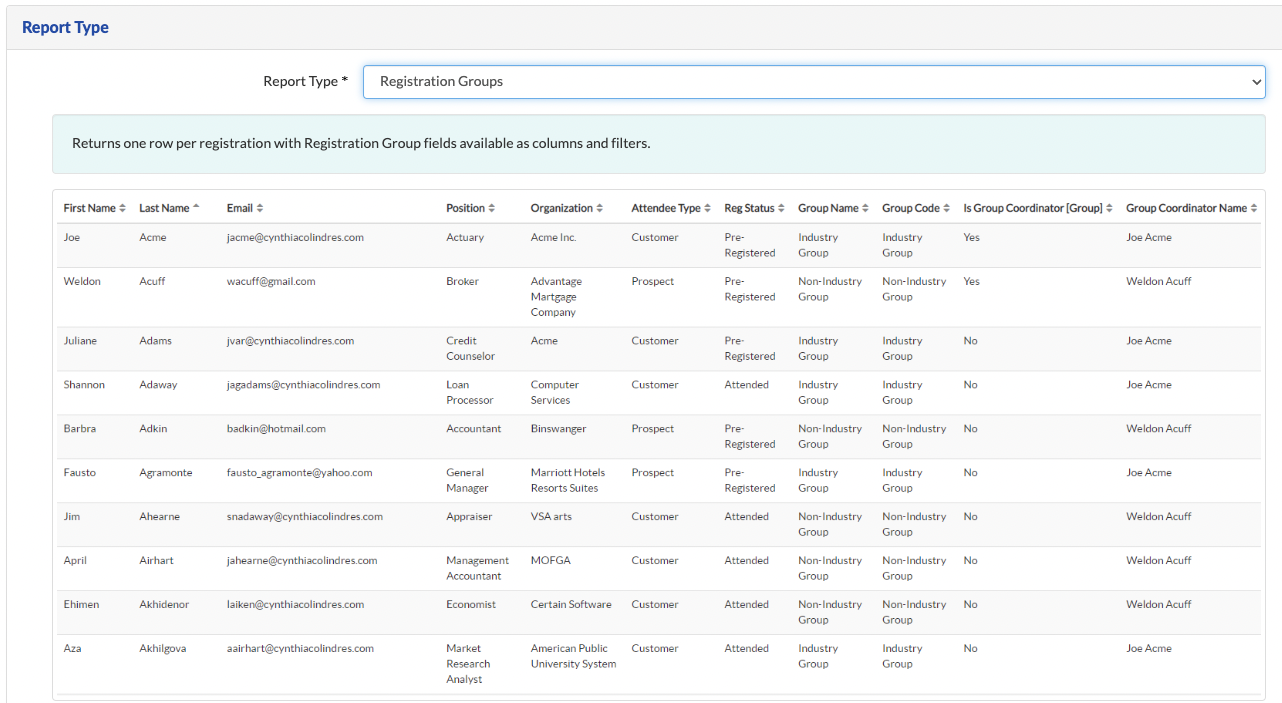
Group fields are then available in the places you would expect:
1. Select them as data fields to be included.
“Is Group Coordinator” indicates whether the registrant is the coordinator of their group, as set by the coordinator check box on their registration record.
2. Group information by them (for example, by Group Name or Group Code).
3. Use them as filters
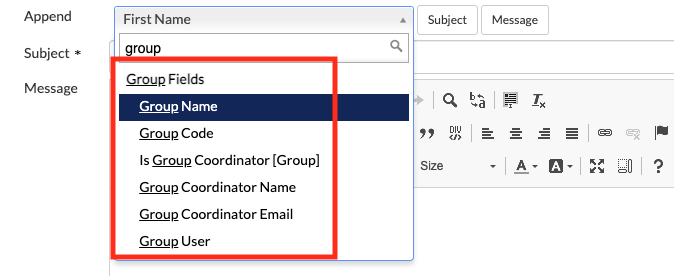
Emails
The same group fields are available for inclusion in emails. When setting up an email, you can add them as dynamic data fields just as you can other registrant information.
Comments
0 comments
Please sign in to leave a comment.